Transcoding Rules Editor window
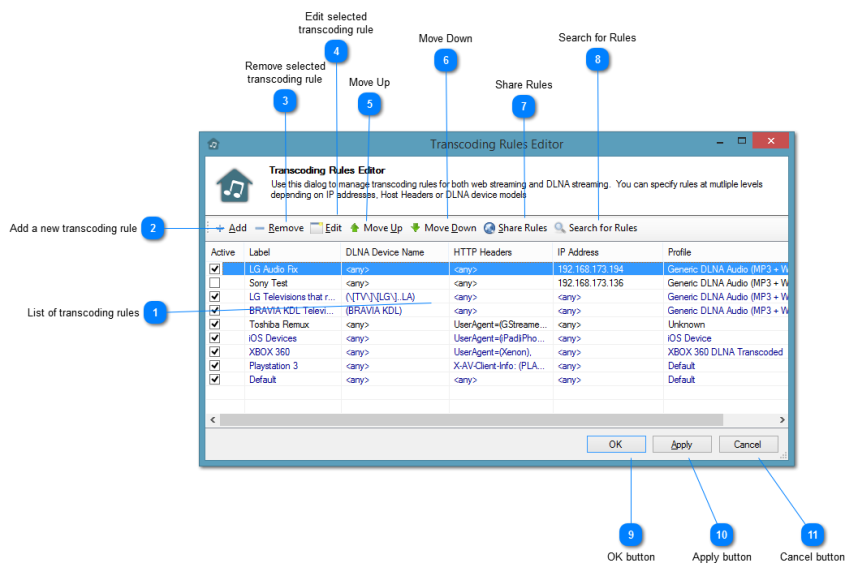
The Transcoding Rules Editor window allows you to define transcoding rules that will be used for either streaming via iHomeServer Web Access or streaming to DLNA clients. The same set of rules is used for either types of streaming client.
The Transcoding Rules Editor is available from the 'Edit' button that appears next to 'transcoding rules' on both the Network and DLNA tabs of the iHomeServer Settings window.
The processing priority of the profiles runs from the bottom of the list to the top of the list so by default no transcoding is applied unless incoming requests match one of the active profiles in the list from bottom to top.
The key components of this window are described further below.
 List of transcoding rules
This table shows a list of the currently defined transcoding rules along with a summary of the conditions upon which the rule will be fired. Only rules marked 'Active' will be applied. User generated transcoding rules are displayed in a black font; internally generated rules are displayed in a blue font.
|
|
 Add a new transcoding rule
Click 'Add' to add a new transcoding rule to the list. The ' Transcoding Rule Parameters' window will display and let you enter the conditions and resulting Transcoding Profile that should be applied. Note that the processing of transcoding rules goes from the bottom of the list to the top of the list, so ensure that your newly added rule is in the right place before committing it. You must click 'OK' or 'Apply' to make the commit the change.
|
|
 Remove selected transcoding rule
Click 'Remove' the remove the selected transcoding rule (or rules) from the list. Click 'OK' or 'Apply' to commit the change.
|
|
 Edit selected transcoding rule
Click 'Edit' to edit the currently selected transcoding rule. The ' Transcoding Rule Parameters' window will display and let you enter the conditions and resulting Transcoding Profile that should be applied. Note that you can only edit user defined transcoding rules (those appearing in black in the "List of transcoding rules" section), however you can always disable the built-in rules if required. You must click 'OK' or 'Apply' to make the commit the change. |
|
 Move Up
The processing of transcoding rules goes from the bottom of the list to the top of the list, therefore use the 'Move Up' button to increase the relative priority of the selected transcoding rule
|
|
 Move Down
The processing of transcoding rules goes from the bottom of the list to the top of the list, therefore use the 'Move Down' button to decrease the relative priority of the selected transcoding rule
|
|
 Share Rules
The Share Rules button will upload both the transcoding rule and the underlying transcoding profiles to the bizmodeller website so that you can share newly created rules that work on your specific devices with other iHomeServer users. After uploading the rule you will be directed to a web page where additional information about the transcoding rules can be entered.
|
|
 Search for Rules
The "Search for Rules" button will open a web page with a list of all the rules that have been generated either by bizmodeller or by iHomeServer users allowing you to find specific profiles / instructions for your own device. This is useful if your browser/DLNA device cannot natively stream media and the built-in transcoding profiles do not work.
|
|
 OK button
The OK button commits the changes you have made and closes the dialog.
|
|
 Apply button
The OK button commits the changes you have made but does not close the dialog.
|
|
 Cancel button
The Cancel button abandons the changes you have made and closes the dialog.
|
|