Set-up a DVD drive for automated ripping window
The Watch Folder tab has a toolbar button called 'Add DVD':
This button lets you quickly set up DVD rippiong from a DVD/Bluray drive on your computer. The option is only enabled if you have Handbrake installed on your computer.
Pressing the button brings up the following window. When you press 'OK', iHomeServer will automatically create a Watch Folder over the selected DVD/Blu-Ray drive and with the default video conversion settings enabled that will automate your DVD ripping process.
Note that the iHomeServer 'Home' tab also provides quick access to this window if you click the 'Enable' button next to the 'DVD RIPPING TO ITUNES' feature row.
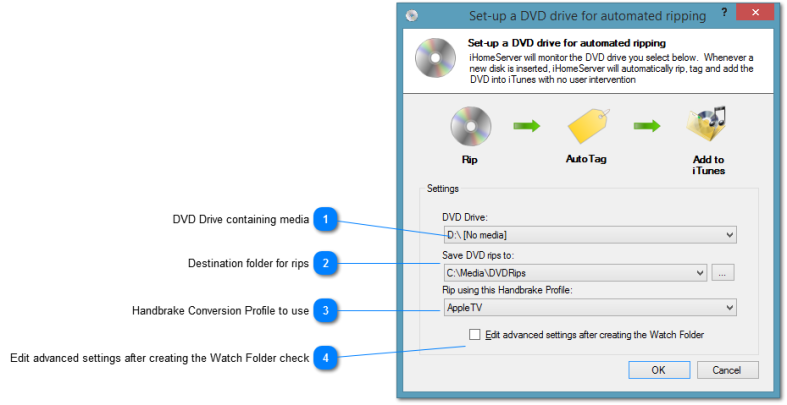
 DVD Drive containing media
Choose the source DVD drive that you want to be monitored and ripped. Note that iHomeServer can rip encrypted DVD and BluRay movies. If your movies are encrypted you will need to use third party software decryption methods such as AnyDVD, however, you must check the copyright laws in your country and the DVD/Bluray country of origin to ensure you only make legal copies if your videos.
|
|
 Destination folder for rips
Select the Watch Folder into which the ripped videos will be created. To create a new Watch Folder, see the topic on Adding New Watch Folders. |
|
 Handbrake Conversion Profile to use
Select the Handbrake Profile that will be used by Handbrake to rip the DVD/BluRay. The available profiles are the ones built-in to the Handbrake application.
|
|
 Edit advanced settings after creating the Watch Folder check
The "Setup a DVD drive for automated ripping" is simply a wizard over the standard Add Watch Folder window. When you press 'OK' an iHomeServer Watch Folder is created over the drive you specified and its video conversion settings are configured with default values to get you going. If you want to configure any advanced settings for the created Watch Folder (eg specify that the ripped movies get tagged as Movies, configure AutoTag or tweak the video conversion settings), then click this option. Once you press 'OK', the Watch Folder will be created and the Edit Watch Folder window will appear allowing you to fine tune your settings. |
|