Installing and Configuring iTunes on a Windows Server
This means that compatibility with Apple iTunes technologies such as Home Sharing, AirPlay, iCloud, etc is increased and iHomeServer should support future functionality that Apple adds to iTunes in the future.
This section provides further information about how to install and configure iTunes. Note that this section is mainly applicable to those users who want to manage iHomeServer on a Windows Server and leverage iHomeServer's Watch Folder features to automatically import their server media. If you are solely interested in
iHomeServer's Web Access and
DLNA streaming feature, then you may want to skip this chapter.
Installing on Windows 8/7/XP/Vista or Windows Server 2008
If you are installing iHomeServer™ on a non-Windows Home Server Operating System then installation of iTunes is as per Apple's recommendations. Simple download the relevant version (32-bit or 64-bit) version on your PC/server, double-click the installation and complete following Apple's installation instructions
You will also need to install the latest version of QuickTime on your system. QuickTime, at the time of writing, only comes in a 32-bit package, therefore just download and install the latest version.
Installing on Windows Server 2012 Essentials or Windows Home Server 2011
If you are installing iHomeServer on Windows Home Server 2011, it is perhaps easier to download the iTunes and QuickTime setup programs from your normal desktop PC first. Log onto the Apple web site, find the iTunes download page. If you are using a 64-bit Windows PC then download the version that is offered to you as it will match that appropriate for Windows 2012 Essentials or WHS 2011. If, however, you are using a 32-bit Windows PC then scroll to the bottom of the download screen, and click the link to the 64-bit version. Then download file that to your Downloads area.
You will also need to install the latest version of QuickTime on your system, again from the Apple website. QuickTime, at the time of writing, only comes in a 32-bit package, therefore just download the latest version to your local Downloads area.
Once you have downloaded both install packages, open up a Shared Folder on your server, eg Documents, using the WHS Quick Start tool. Copy the installation files from your local Downloads area to suitable folder within it (eg "iHomeServer Downloads").
Installing on Windows Home Server v1 or Windows Server 2003
If you are installing iHomeServer on either Windows Home Server v1 or Windows Server 2003, it is a little more complicated. Apple does not support iTunes on either of these Operating Systems therefore the Apple iTunes installation routine will typically break with a 'Please install Windows XP SP2' error message when installing Apple Mobile Services.
bizmodeller has released a free tool that patches the Apple installation package to skip this error and continue installation normally. Please note that this tool is not endorsed by Apple and does not provide support on these Operating Systems. Also note that using this tool is entirely at your own risk and is not supported by bizmodeller.
If you wish to proceed, you should download the iTunes and QuickTime setup programs from the Apple website using your normal desktop PC first. Log onto the Apple web site, find the iTunes download page. If you are using a 64-bit Windows PC then scroll to the bottom of the download screen and find the link to the 32-bit version as that is the version appropriate for WHS v1 / Windows Server 2003. If, however, you are using a 32-bit Windows PC then you can download the link to the 32-bit version that is offered. Then download file that to your local Downloads area.
You will also need to install the latest version of QuickTime on your system. QuickTime, at the time of writing, only comes in a 32-bit package, therefore just download the latest version to your local Downloads area.
Finally, you will need to download the bizmodeller tool for patching the iTunes installation program. This can be downloaded from the 'Products' page on
our web site - www.bizmodeller.com. The tool is called the "WHSv1 iTunes Installer". Once again, download this file to your local Downloads area.
Once you have downloaded all three components, open up a Shared Folder on your server, eg Software, using the WHS Quick Start tool. Copy the installation files from your local Downloads area to that folder.
To install iTunes, you cannot just double-click the iTunes set up program. Instead you need to use the "WHSv1 iTunes Installer" program you downloaded previously to run the iTunes set up program so that it can patch the installation files to allow installation on Windows Home Server v1. Double-click the WHSv1iTune
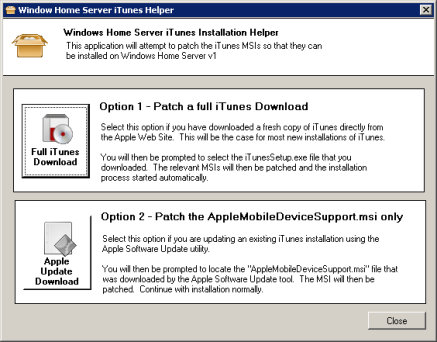
You will now see the following screen:
Select 'Option 1 - Patch a full iTunes Download' - this will now prompt you to locate the iTunesSetup.exe file you downloaded and stored in your Software folder. Navigate to where you copied this file to and select the file. The WHSv1 iTunes Installer program will then launch the iTunes installation program.
You will then be asked to confirm that the iTunes setup program can run and then installation should proceed normally. The WHSv1 iTunes Installer will patch the AppleMobileDeviceSupport.msi transparentl in the background without user involvement.
Please note that iTunes is not supported by Apple or bizmodeller on Windows Server 2003 or Windows Home Server v1 so use at your own risk.
Once iTunes has been successfully installed, don't forget to install QuickTime, which you downloaded earlier. This installation proceeds normally so you don't need to use the WHSv1 iTunes Installer program.