Add a Synchronisation Relationship
The 'Synchronise with another iTunes library' window allows you to set up a Synchronisation Relationship between one iHomeServer instance and another iHomeServer instance. You can set up multiple relationships to the same target iHomeServer or to multiple target iHomeServers as you wish.
Only iHomeServers that have been configured to allow connections from remote iHomeServer Management Consoles and have the check box ticked to allow your iTunes library to be synchronised by other iHomeServer servers. Both these options are on the Network tab of the Settings dialog and need to be set on the instance of iHomeServer that holds the content you want to synchronise.
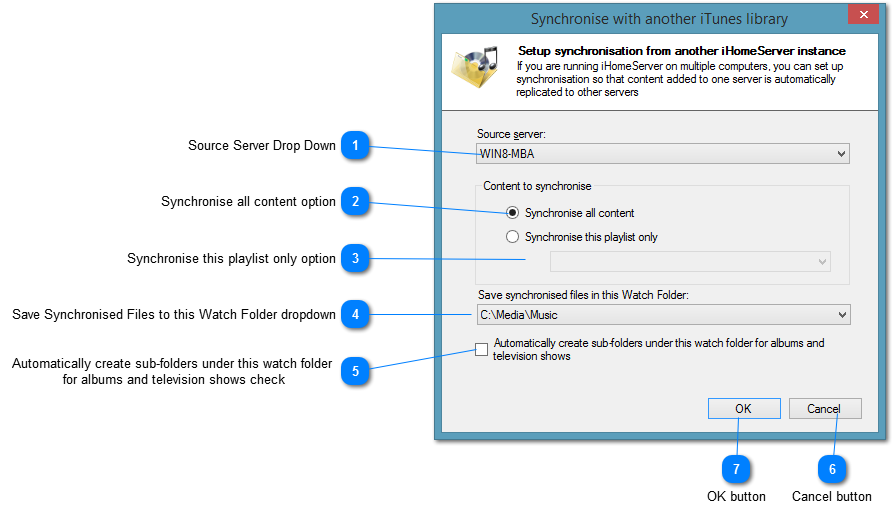
 Source Server Drop Down
The Source Server drop down contains a list of all the iHomeServer instances on your local network that are configured to allow content to be shared with other iHomeserver libraries. If the iHomeServer instance you want to synchronise content from does not appear in this list, please open the iHomeServer Management Console on the computer running that instance of iHomeServer. Within the Settings window, open the Network tab and ensure that the "Allow connections from remote iHomeServer Management Consoles" and the "Allow your iTunes library to be synchronised by other iHomeServer servers" checkboxes are both ticked.
Note that you can only see iHomeServer instances that are on the same local network and IP subnet as the iHomeServer instnace you are logged into.
|
|
 Synchronise all content option
There are two options for synchronising content - you can either synchronise all content within the iTunes library or you can elect to only synchronise content from a Playlist. If this option is selected then all content will be synchronised.
|
|
 Synchronise this playlist only option
There are two options for synchronising content - you can either synchronise all content within the iTunes library or you can elect to only synchronise content from a Playlist. If this option is selected then you must select a Playlist to synchronise in the drop down menu. Synchronisation will be limited to content that appears in that playlist.
|
|
 Save Synchronised Files to this Watch Folder dropdown
Once media has been synchronised, it needs to be saved somewhere. Use this option to specify the target Watch Folder where synchronised content should be stored. If you want to store content in a new folder, please create a new Watch Folder first, and then re-create the synchronisation relationship.
|
|
 Automatically create sub-folders under this watch folder for albums and television shows check
In order to keep your synchronised content organised, you can select this option to automatically create sub-folders under the Watch Folder you selected above [4] for Albums and Television shows.
|
|
 Cancel button
This button closes the dialog without making any changes.
|
|
 OK button
This button commits the changes that have been made and closes the dialog.
|
|